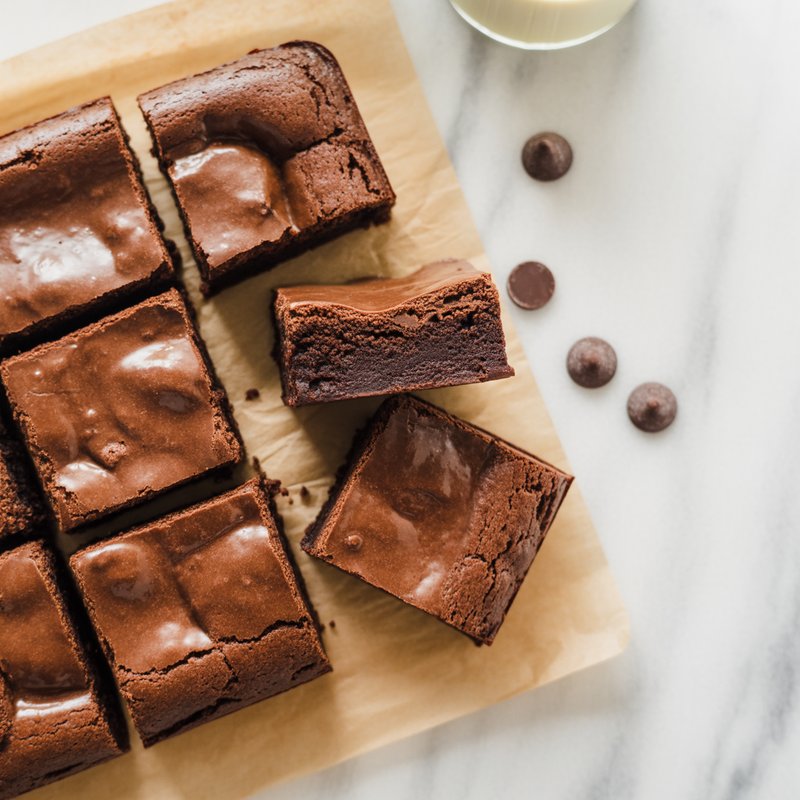
There’s a moment midweek, usually around 9 p.m., when the sweet tooth shows up and good intentions wobble. You want something chocolatey and real, not a protein bar. You also don’t want to undo your day’s work. That’s where these cottage cheese protein brownies earn their keep. They’re rich, fudgy, and satisfying like a bakery brownie, but built on Greek yogurt’s cousin and cacao’s depth. No oil, no butter, and no weird aftertaste. Just proper brownies you’ll actually make again.
I’ve baked with protein for a long time, both at home and in a small meal-prep kitchen where consistency mattered because 60 trays had to turn out the same every time. Cottage cheese gives you a quiet, reliable structure that whey alone doesn’t, while keeping everything moist without fat. If you’ve ever pulled a rubbery, squeaky protein brownie https://hartjrttlth.gumroad.com/p/keto-cottage-cheese-pancakes-low-carb-high-protein-bliss out of the oven and wondered who hates joy, this is your antidote.
What “healthy” means here
Healthy is contextual. If you’re cutting, “healthy” might mean high protein per calorie. If you’re feeding kids after practice, it might mean whole ingredients and steady energy. These brownies try to thread that line.
- Protein, not token amounts: You’ll get roughly 9 to 12 grams of protein per square depending on your pan and serving size, enough to matter. Lower fat without dryness: No oil or butter, yet the crumb stays fudgy because dairy proteins and starch carry the moisture. Real chocolate flavor: We use natural cocoa and a measured amount of chocolate chips so it tastes like dessert, not a chalky compromise.
If you need ultra low sugar, I’ll show you how to use a blend of sweeteners that tastes close to classic brownies. If you prefer regular sugar and a few more chips, that’s fine too. The base holds.
Why cottage cheese belongs in brownies
Cottage cheese is basically milk’s protein, water, and a little lactose, with minimal fat if you choose the low-fat tub. When you blend it smooth, it behaves like a high-protein Greek yogurt with a cleaner, firmer set. That matters for brownies because:
- Structure: Casein proteins set gently as they heat, giving body without requiring much flour or oil. Moisture: The water in cottage cheese keeps the interior soft, even on day two. Neutrality: Once blended and mixed with cocoa and vanilla, the tang recedes, leaving chocolate upfront.
I’ve tested this with both 2 percent and fat-free cottage cheese. The 2 percent gives a slightly silkier texture and better browning on the edges. If fat-free is what you have, it still works, but you’ll want to keep a closer eye on bake time to avoid overbaking.
The base recipe that actually works
Yield: 12 to 16 brownies, depending on how you cut them
Pan: 8-inch square for thick brownies or 9-inch square for a slightly thinner, quicker bake
Ingredients:
- 1 cup (240 g) cottage cheese, 2 percent preferred 2 large eggs, room temperature if possible 1 teaspoon vanilla extract 1/3 cup (70 g) granulated sweetener of choice, see notes 1/4 cup (50 g) brown sugar or packed coconut sugar, optional but recommended for taste and moisture 1/3 cup (32 g) unsweetened cocoa powder 1/3 cup (35 g) whey protein isolate, unflavored or chocolate, see protein notes 1/2 cup (60 g) white whole wheat flour or oat flour 1 teaspoon instant espresso powder, optional but boosts chocolate 1/2 teaspoon baking powder 1/4 teaspoon fine sea salt 1/4 cup (45 g) mini chocolate chips, plus a spoonful for the top
How to make them:
- Preheat your oven to 350°F, 175°C. Line your pan with parchment, leaving a little overhang for easy lifting. Lightly mist the paper if yours tends to stick. Blend the wet base: In a blender or with an immersion blender in a tall jar, blend the cottage cheese, eggs, vanilla, and sweeteners until completely smooth, about 30 to 45 seconds. No curd bits. This step determines texture. Whisk the dry: In a mixing bowl, whisk cocoa, protein powder, flour, espresso powder if using, baking powder, and salt until uniform. If cocoa is clumpy, sift it first. Combine: Pour the blended mixture into the dry bowl. Fold with a spatula just until you no longer see dry pockets. The batter should be thick but spreadable, similar to yogurt cake batter, not pourable like brownie boxed mix. Fold in the mini chips. Bake: Spread into the prepared pan, smoothing the top. Scatter a few extra chips on top for visual cues and a little snap. Bake 18 to 24 minutes in an 8-inch pan or 16 to 20 minutes in a 9-inch pan. You want the center barely set, with a few moist crumbs on a toothpick, not wet. The edges will look matte, the center faintly glossy. Cool: Let the pan cool on a rack for at least 30 minutes, then lift and chill for 45 to 60 minutes before slicing if you like a denser, fudgier texture. Warm slices taste cakier, cold slices taste truffly.
Texture note: If your brownies dome dramatically, you probably mixed too vigorously or used a whey concentrate that expands more. They’ll still eat well, but next time reduce mixing and check your protein type.
Protein powder, translated
This is the spot people get burned. All proteins are not interchangeable.
- Whey isolate vs concentrate: Isolate is cleaner and drier, which sounds bad but is ideal here because cottage cheese brings moisture. Concentrate can work, but use 10 to 15 percent less by volume and expect a slightly spongier crumb. Casein or a whey-casein blend: Very tender and fudgy because casein gels slowly. If you use micellar casein, reduce the flour by a tablespoon to avoid over-thickening. Plant protein: Pea blends can work, but they’re thirsty and can taste earthy. If using a pea blend, reduce to 1/4 cup, add an extra tablespoon cocoa for flavor, and increase sweetener by a teaspoon. Also add 1 tablespoon milk of choice to balance the batter.
If your protein is flavored and sweetened, dial back the sweeteners a bit. Taste the blended wet base; it should taste like slightly sweet chocolate pudding before it hits the flour.
Sweetness without regret
Straight erythritol can crystallize and give a cooling effect in fudgy bakes. Allulose and monk fruit blends behave better in brownies because they brown and hold moisture. If you prefer regular sugar, use 1/3 cup white sugar and 2 tablespoons brown sugar, then reduce the granulated sweetener or skip it entirely. The small amount of brown sugar has a functional job: it binds water and deepens flavor, which combats the dryness that protein powders can bring. That’s why I recommend keeping at least a little.
If you’re tracking macros tightly, you can go fully sugar-free with allulose or a monk fruit, allulose blend. The texture stays softer, but the top may not crackle as much, which is more cosmetic than anything.
A quick testing story from a busy weeknight
A client once asked for “brownies I could eat before my 6 a.m. lift without feeling like I ate cake.” The first batch had great macros on paper, but I cut them too soon, still warm, and they read caky and protein-forward. The next day, the same batch after an overnight chill tasted like a dense chocolate bite with better sweetness. Same ingredients, different timing. The practical point: protein brownies need a cool-down window to set their crumb. The fridge helps the cocoa bloom and the dairy firm. If you serve these right out of the oven, you’ll think they’re fine. If you give them an hour, you’ll think they’re excellent.
Troubleshooting by symptom
Dry edges with a gummy center: Likely overbaked for your pan size or your oven runs hot. Reduce bake time by 2 to 3 minutes and use an oven thermometer. Also check your protein amount and type, isolates plus a thin pan can dry the edges fast.
Rubbery bounce: Usually too much whey concentrate or overmixing. Protein strands tighten like overcooked eggs. Next time fold gently, stop when combined, and consider switching to isolate or adding 1 tablespoon of plain yogurt to loosen the batter.
Cottage cheese flavor sneaking through: Either you used fat-free cottage cheese that was very tangy, or your cocoa wasn’t robust. Add the espresso powder and an extra teaspoon of vanilla next batch, or swap half the cocoa for Dutch-process for a rounder chocolate profile. Blending fully matters.
Collapsed center: Underbaked. The toothpick should show a few moist crumbs, not streaks of batter. If your protein is casein-heavy, it needs the full set time, and it will continue to firm as it cools, so avoid panic-baking it until dry.
Too sweet or not sweet enough: Taste the blended wet mixture. Adjust there before it ever hits the dry ingredients. An extra teaspoon of cocoa can balance an overly sweet protein powder without rebalancing everything else.
Ingredient swaps that still work
Flour: White whole wheat keeps fiber up and texture soft. Oat flour gives a brownie that skews slightly more tender and moist because oats bind water. If you mill oats in a blender, measure after blending for accuracy. Almond flour doesn’t behave the same here, it lacks starch and will turn greasy with chips, and the structure suffers without eggs plus extra binders. You can make it work, but it becomes a different recipe.
Eggs: Two eggs are doing a lot here. If you need an egg-free version, use 3 tablespoons aquafaba plus 2 tablespoons plain Greek yogurt in place of each egg as a starting point, but expect a softer set and shorten the bake by a few minutes to avoid dryness. It won’t cut as clean.
Dairy-free path: If you need dairy-free, cottage cheese is the blocker. The closest workaround is silken tofu plus a casein-free plant protein blend. Blend 220 g silken tofu with 1 tablespoon lemon juice for brightness, then proceed. It lands between a brownie and a tofu-chocolate snack bar. Good, not identical.
Cocoa: Natural cocoa gives a slightly brighter cocoa flavor that plays well with espresso powder. Dutch-process is smoother and dark. Split the difference: half and half is often the best-tasting option in high-protein brownies.
Chocolate chips: Mini chips distribute better so you get more bites of chocolate with fewer grams. If you’re aiming low sugar, use 50 percent cocoa chips or sugar-free chips, but choose a brand that melts cleanly to avoid waxy pockets.
Step-by-step cues that matter more than timing
Time is a guideline. Visual cues save batches when ovens vary.
- The top transitions from glossy to matte at the edges first. When the center is just starting to lose its gloss and a gentle tap jiggles the pan slightly but not like a wave, pull it. The aroma changes from sharp cocoa to deep chocolate and vanilla, usually 2 to 3 minutes before perfect doneness. It’s subtle, but once you notice it, you’ll bake better instantly. A warm knife should meet gentle resistance when cut at the edge. If it glides like pudding, give it another 2 minutes.
These little observations beat clock watching.
Macros and serving size, with honesty
Per square, cut 4 by 4 in an 8-inch pan, you’ll land roughly in this range depending on your exact ingredients: 140 to 190 calories, 9 to 12 g protein, 16 to 22 g carbs, 3 to 6 g fat, 2 to 4 g fiber. Variation comes from your protein powder, whether you used allulose or sugar, and chip choices. If you change proteins, weigh your scoops. Labels vary wildly, and the wrong scoop size is a common reason a recipe swings by 40 calories per piece.
If you’re using these as a pre-lift snack, one square and a small banana hits that 25 to 35 g carb plus 10 to 15 g protein window many lifters prefer. For evenings, pair with berries or a dollop of skyr if you want more protein without another square.
Storage, freezing, and batch strategies
Room temperature: They’re fine in an airtight container for 24 hours, especially in cooler months. The top stays soft.
Fridge: Ideal for 4 to 5 days. The chill firms the texture and deepens the chocolate. Stack with parchment between layers to avoid smudging.
Freezer: Wrap individual squares and freeze up to 2 months. Thaw in the fridge overnight or give it 20 to 30 minutes at room temp. You can microwave for 10 to 12 seconds for a warm center, but don’t overshoot or you’ll reanimate the protein and make it tough.
Meal prep angle: For clients who need grab-and-go protein, I often bake in a 9-inch pan, cut 12 squares, and package two squares per container with a small container of berries. It travels well, and you avoid the afternoon vending machine spiral.
When to tweak and when to leave it alone
If your first batch is 80 percent of what you want, change a single variable at a time. Common targeted tweaks:
- More fudgy: Reduce flour by 1 tablespoon or replace 1 tablespoon of flour with cocoa. Pull the bake 1 minute earlier and chill fully before cutting. More sweet: Increase brown sugar by 1 tablespoon or switch to a sweeter protein powder, but understand that sweetness often masks bitter cocoa or coffee notes, so check your cocoa quality too. More cakey: Add 1 tablespoon milk, increase baking powder to 3/4 teaspoon, and bake 2 minutes longer. More intense chocolate: Add 1 ounce melted 70 percent chocolate to the batter, whisked into the blended wet ingredients. It slightly increases fat but pays off in flavor.
Avoid the urge to pile in more protein just because it’s a “protein” brownie. Past a point, you’re eating a chewy protein bar in brownie cosplay. The sweet spot for texture is usually 20 to 30 percent of the flour, cocoa, protein trio coming from protein powder by weight. Here we’re right in that zone.
A quick scenario you might recognize
You’re hosting friends Sunday afternoon. One guest is dairy flexible, one is watching sugar, one doesn’t care and just wants something good with coffee. You make these brownies with 2 percent cottage cheese, allulose for the granulated portion, and keep the 2 tablespoons of brown sugar. You use half natural and half Dutch cocoa, and mini chips on top only. You bake in a 9-inch pan for 18 minutes. You chill them while you prep a salad. When it’s time, you cut small squares, serve with sliced strawberries and a pitcher of cold brew. Everyone is happy. The one watching sugar takes two home. The one who doesn’t care asks for the recipe, which is the best sign the “healthy” version doesn’t advertise itself.
Common questions, answered plainly
Can I make these without a blender? You can, but you must whisk the cottage cheese until smooth. A stick blender takes 30 seconds and avoids curds in the final texture. If you only have a whisk, press the cottage cheese through a fine mesh sieve first.
Do I need the espresso powder? No, but it helps cacao taste like chocolate. You won’t taste coffee at 1 teaspoon.
Why baking powder, not baking soda? We don’t have enough acid in this batter to properly activate soda, and powder gives a gentle lift without turning the flavor metallic or creating tunnels.
Can I double the recipe? Yes, in a 9 by 13 inch pan. Add 3 to 5 minutes to the bake time. Check at 22 minutes and adjust.
My brownies don’t have a shiny crust. Oil and dissolved sugar interacting with heat usually create that crackly top. With no oil and lower sugar, you won’t get it by default. If this matters to you, whisk 2 tablespoons of sugar into 2 tablespoons hot water until clear, then fold into the batter with the chips. It nudges the crust toward shine without much calorie impact.
A short note on cocoa quality and why it pays off
If you’ve ever wondered why bakery brownies taste rounder, it’s often the cocoa. Cheap cocoa can be flat and dusty. A mid-tier Dutch-process cocoa paired with a good natural cocoa gives depth without you needing to use a ton. I keep one tin of each and blend them. The difference in a protein brownie, where you don’t have butter or lots of chocolate to carry flavor, is noticeable.
Variations that keep the spirit
Peppermint chip: Add 1/4 teaspoon peppermint extract and swap half the chips for chopped dark chocolate. Go light on the mint, it shouts.
Walnut crunch: Stir in 1/3 cup chopped toasted walnuts, and sprinkle a pinch of flaky salt over the top before baking. Nuts contribute fat, so expect a slightly more tender edge.
Mocha swirl: Marble 2 tablespoons of strong coffee concentrate into the top before baking. It creates ribbons and a gentle bitterness that plays well with sweetener-heavy versions.
Raspberry ribbon: Dollop 3 tablespoons seedless raspberry jam on top and swirl lightly. Baking time may increase by a minute. The tartness against the chocolate makes the low-oil base feel rich.
Peanut butter drizzle after baking: Microwave 2 tablespoons powdered peanut butter with 1 tablespoon water and a teaspoon of honey until smooth, then drizzle over cooled brownies. Flavor without heavy fat.
Why this fits a training or busy-life routine
Life gets simpler when your desserts and snacks double as useful calories. These brownies hit that middle ground. If you’re lifting early, one square won’t sit heavy. If you’re on a cut, the protein helps satiety late at night. If you’re feeding a household, a pan disappears without anyone asking what you substituted. That last part matters. The most successful “healthy” bakes are the ones you want even when you’re not trying to be virtuous.
After a few batches, you’ll memorize the rhythm: blend, whisk, fold, bake, chill. The whole process takes 15 minutes active and 20 minutes passive. Clean bowl, clean blender, parchment lift, done. And when 9 p.m. rolls around, you can have your brownie without bargaining with yourself.
Quick prep recap for the fridge door
- Blend cottage cheese, eggs, vanilla, and sweeteners until smooth. Whisk cocoa, protein powder, flour, baking powder, salt. Fold wet into dry, add chips, smooth into lined pan. Bake 16 to 24 minutes by pan size, pull at moist crumbs. Cool, then chill for best fudgy texture.
When you’ve got that down, start tweaking for your preferences. Too many recipes force you to accept “healthy tasting” as the cost of better macros. You don’t need to settle. These hold their own against standard brownies, especially once you let them rest. And that, more than any macro, keeps the habit going.